Intro
Great news to all my followers as I picked up a Sangean ATS-505 shortwave radio this week. I did not hesitate to perform a quick function test, listen to a few stations, and familiarize myself with the radio. My first impression - Not bad! I couldn't wait to get the screwdriver out and a schematic on the screen!
This radio design was sold under several brands including Radio Shack. Radio Shack's model DX-402 and a later version under catalog number 200629 (20-629). This design was also used in the Roberts R9914 and Sangean ATS-505P. It appears that the Radio Shack 200629 and Sangean "Blue Label" ATS-505's incorporate a different AF chip for better sound. The processor was also reprogrammed to eliminate chuffing as well.
It is a fairly decent radio overall with exceptionally great AM/FM sensitivity for DX'ers. I don't test LW in the United States, but shortwave reception is on par with my Grundig G5.
There seems to be challenge to find the best portable radio when it comes to features, reception, audio, and size, however this receiver performs well for it's size and provides some nice features.
Disable muting while tuning aka "chuffing"
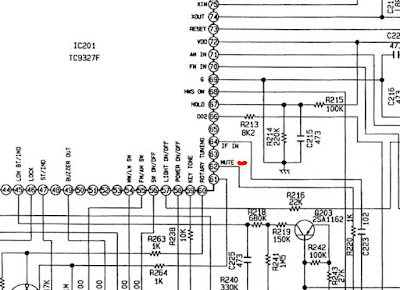
This radio has a similar design to the ATS-818 and ATS-909 where the PLL muting circuit is processed by the controller chip. In this case, it is a Toshiba TC9327F 4-Bit Microcontroller.
Pin 52 of the microcontroller is the Mute I/O port that connects to Pin 5 of CON2. Removing this single wire connection allows the radio audio (AF) to be heard while tuning or scanning.
Steps
- Detailed disassembly instructions here https://earmark.net/gesr/2000629.htm
- Remove all batteries from the radio
- Rotate the whip antenna up a few inches.
- Locate and remove 5 screws ( under whip antenna has a short screw, middle and bottom screws are longer, and one near the antenna base) Do not remove the screw which does not have an arrow pointed to it. This is used to secure the antenna
- Remove the rotary tuning knob by gently pulling straight off (don't lose the plastic washer under this knob because it is used to prevent dust and direct moisture from entering the radio
- Use a plastic pry tool or small flat blade screwdriver to gently pry apart the radio at the seam. There are several plastic tabs securing the radio. Go slow! There are two tabs on the bottom, one tab on the ext antenna jack side, and one tab on the top of the radio.
- Remove the front of the radio and fold it over as not to interfere with the speaker wires.
- The display (controller board) is held in place with two screws. Remove them.
- Locate the 3 tabs on the bottom and two tabs on the top of the board. Gently pry back the tabs while lifting the circuit board up (Push the lock slider out of the switch while moving the board up
- There are two connectors attached to the controller board. Lift up the bottom of the board to gain access to Connector 2 (CON2)
- Notice the red wire and 14 white wires. The red wire should be at pin 1 (left side of the radio as you are looking at it)
- Count the wires from left to right and stop at #5. This is the wire you need to cut or remove from the socket
- Cut the wire and secure the ends with tape or heat shrink tubing
- Reassemble the radio in reverse and enjoy!
73!
Jesse W9JES


